
02-06-2020 07:00:39 - Updated: 2 June, 2020
Hydroponic gardens are spreading around the world faster and faster. Today we can see this type of cultivation in vertical walls of many cities, urban gardens and especially in hydroponic cannabis growing at home.
At first you may think that it takes a lot of money to be able to grow this way. Believe it or not, it pays off in the long run, because you will not only save on soil, but also on fertilizer, water and electricity consumption.
In this post we will discuss how to grow weed in hydroponics, how to prepare the nutrient solution, as well as the best fertilizers, lamps and other necessary components. Sounds good, doesn’t it? Well, let’s go…
🧐 How does a hydroponic system work?
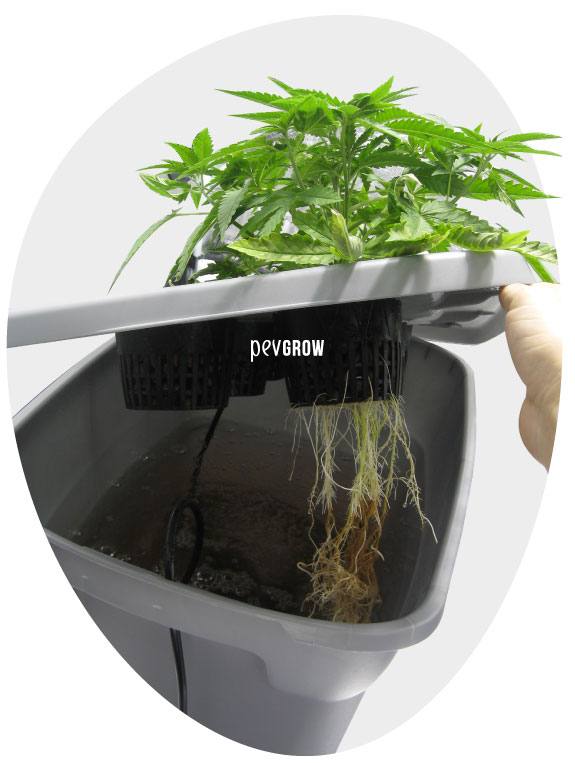
This growing method is based on a great availability of food and air by the roots of the plants. When growing in soil, the plant performs a cation exchange process to absorb the nutrients arranged in the soil. Well, in hydro cultivation this process is greatly accelerated, so the plants manage to increase the rate of their metabolism and yield much more.
This is the most efficient way to achieve a large harvest in the shortest time, which is why it has displaced other cultivation systems, both in intensive agriculture and in domestic cultivation.
When and how did it begin?
The hydroponic technique is quite old, although we may think it is a NASA or modern discovery is not like that. The first records of hydroponic growing projects show that similar methods were already being used centuries before Christ, one example being the gardens of Babylon, but even the Aztecs used it.
Later the techniques evolved and John Woodward published around 1699 revolutionary studies. Soon after came the studies of Sachs and Knop, the so-called fathers of Aquaculture. During the last century it was improved and today we have many different kinds of hydro systems.
💻 Indoor Hydroponic Cannabis Cultivation
It is thought that the first people to use cannabis hydroponics in the world were the Hawaiians in the 1970s or so. It quickly spread into the Californian stream which at that time dominated the “grow culture“. This, coupled with the proliferation of indoor cultivation, forced by Nixon’s repression, encouraged the expansion of this system.
Many people began to try hydroponics at home, which led to the appearance of General Hydroponics in California in this decade. This company set a standard in the feeding of cannabis plants grown without soil, which continues up to now.
🎬 Which materials do I need to grow Hydroponic weed?
In addition to the lighting, ventilation and other tools that any cannabis growing environment needs to create the right environment, in the case of hydro you need one of the systems available on the market, or make it yourself with the following materials:
- 23.8 US gal (90-litre) tank or similar
- Tank lid (Can be made of plastic or porexpan)
- Water pump
- Air pump
- Diffuser stone
- Non-toxic tube
- Tubes and drippers
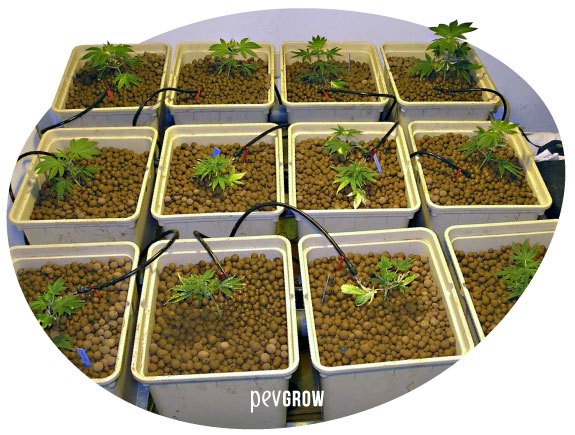
- Buckets or slabs of rock wool, or alternatively 5 litre pots with arlita
- Tray or growing table with drainage
- Timer
- Fertilizers for hydroponics
Place the diffuser stone on the bottom of the tank, connected with the non-toxic tube to the air pump, which is outside. The water pump must also be left inside the tank, of course, and is connected on one side to the tube that will take out the water, and on the other side we leave the network cable plugged in the timer, in order to schedule the watering later.
Once we have prepared everything that is going to be left inside the tank, we should try to place the tubes and the cable that come out of the bombs in a corner, so we can leave the lid over them, which will have to be cut in a corner as well. The idea is that no light should enter it once it is full of water, to prevent algae from coming out.
We take the tube that comes out of the water pump to the growing tray or table, and we prick the drippers that will take the water to the plants, from the tube to the pots or rock wool that we put. In this sense you can use individual drippers of 1 US gal (4 liters)/hour, groups of 8 as the octopussy or others as the model Medusa that are multiple drippers, it depends on the number of plants that you want to put by 3x3ft (m2). Under the drain of the tray we can place a bucket to collect the drainage water, and we would have our hydroponic kit ready.
📱 How to grow cannabis in Hydroponics step by step
It is most common to start from cuttings of the same mother plant when growing hydro weed indoors, making a monoculture. This is so for several reasons, firstly because by sharing irrigation water the ideal is that all the plants in the crop eat the same or as similar as possible, also so that some do not grow much more than others, and especially so that some do not finish before others.
If you root the clones in rockwool blocks, then you can integrate them into larger cubes or rockwool slabs. If you use an aeroclonator, you can use small grid pots with balls of expanded clay. You can then put the rooted clones in this way into larger pots with arlites, just as if you were doing a regular transplant.
Once we have transplanted our clones into the large rockwool buckets, slabs or pots with arlitha balls, we start with the first week of growth.
👾 Hydroponic Diet, how to make the nutritive solution for irrigation
The ideal option is to use osmosis water and start from water with EC = 0. We fill the tank and add calcium and magnesium to 0.4 EC, I highly recommend the Grotek’s Cal-Max, which has a very good distribution. This will be the base water we will always use, from now on, every week we will add the necessary nutrients in each phase, following the growing table of the fertilizer brand we like the most, we are going to follow GHE’s table.
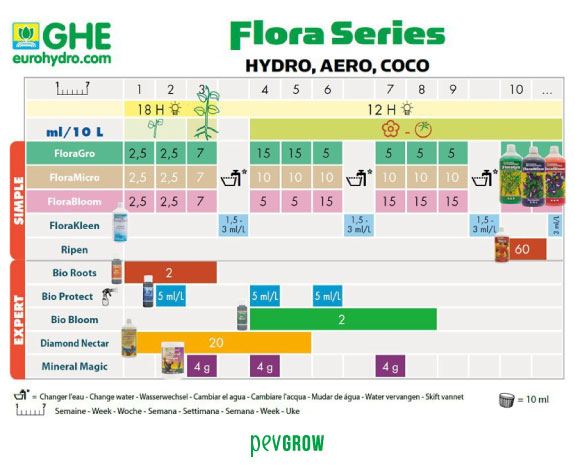
In this table three weeks of growth are indicated, for some varieties this can be too long and the size of the plant can increase. Keep in mind that in hydroponics plants grow much faster, it is possible that with one week of growth your clones get a good size to change the photoperiod to flowering.
Another thing to keep in mind is that we have to change the water and clean the tank when we change from growing to flowering, and then a couple of times during flowering, when we are going to use products for fattening the buds (if we use them) and when we are going to do the root wash.
✅ The importance of PH in Hydroponics
Adjusting the pH is extremely important in cannabis cultivation, especially indoors, and more so than ever in soil-less cultivation, as is this case. If we don’t give the food at each stage with its corresponding PH level, the plants will not be able to assimilate the nutrients from the irrigation, and will start to show deficiencies in a short time.
When we cultivate in land the PH oscillates between 6 and 6.5 approximately, being able to reach up to 6.8 at the end of flowering. In hydroponic cannabis growing, by contrast, the PH level starts at 5.5 in growth and gradually rises to 6.3 at the end of flowering, at a rate of 1/10th to 2 PH per week.
🎯 PH and EC table in hydroponic crops
If you prefer to rely on weekly PH and EC values, rather than on the cultivation tables offered by the liquid hydroponic fertilizer brands, I leave you with this orientation guide. It can be useful in an objective way, it is designed for all the varieties in general, but keep in mind that each one eats one way, and some genetics may need a little more food, as well as some may need less.
| week 1
18 H |
week 2
18 H |
week 1
12 H |
week 2
12 H |
week 3
12 H |
week 4
12 H |
week 5
12 H |
week 6
12 H |
week 7
12 H |
week 8
12 H |
|
| PH | 5.5 | 5.7 | 5.9 | 6.0 | 6.1 | 6.1 | 6.2 | 6.2 | 6.3 | 6.3 |
| EC | 0.6 | 0.8 | 1.1 | 1.3 | 1.5 | 1.7 | 1.8 | 1.8 | 1.6 | 0.4 |
🔥 Watering time in Hydro systems
There is some debate here, as some growers prefer to have continuous watering, others every 15 minutes, and others even 15 minutes every hour only. From our experience we can say that if the hydroponic system is based on a container with Arlita, such as Atami’s Wilma or GHE’s Dutch Pot, you can have continuous watering, but if it is a rockwool slab with 15 minutes every hour it may be enough.
Ideally, the development of the plants should be monitored, because even the same growing system may require different watering times depending on the environmental conditions, the size of the plants or the configuration of the room itself. It is also important to know that, as with food quantity, some varieties consume more water than others.
➕ Conclusion
Growing Hydro Weed is the most interesting at a commercial level, as it can achieve maximum production of buds in the shortest time possible. If you haven’t tried it yet I recommend you do so, because you could be missing out an easy way to multiply performance. Remember to share this post so that it reaches as many people as possible, thank you.


